![pascal_logo.png]](https://help.vartion.com/hs-fs/hubfs/pascal_logo.png?width=160&height=42&name=pascal_logo.png)
Pascal's onboarding module is a flexible platform which enables you to onboard clients in which collaborations take place. Creating customised forms to suit specific situations, verify individual’s identities, support for internally reviewing and approving the process and perform screenings on individuals and companies encountered during the onboarding process is all possible within Pascal.
This article will focus on how to utilise these features and the main process within the Onboarding module.
Initial setup
Before onboarding an reviewing processes can be initiated, some configurations need to be set up. This section will focus on the required configuration, afterwards option configurations are discussed.
Onboarding form templates
An onboarding form template is required to be set up before the review of a client can be initiated. The onboarding form template is used to be answered during a client's review process.
To create a new form template, the below steps can be followed:
- Click on your initials in the top right corner.
- Press Settings to navigate to the configuration options of your account.
- In the Onboarding section, go to the Forms page.
- Press the Create form button, in the top of the page.
When creating an Onboarding form template, several types of questions are available to use:
- True / False – Question in which one option can be chosen.
- Follow-up questions can be added to ask after one of the options in the selection. When adding a follow-up question, all types of questions can be chosen to ask next. If the following question is a True / False question as well, no new follow-up questions can be added.
- Number – Question in which the answer can only be a number.
- Drop down – Question in which the answer can be chosen from a preset selection.
- Short answer – Question in which the answer can be typed in a text field.
- Paragraph – Question in which the answer can be typed in a bigger text field.
- Date picker – Question in which a date can be provided as answer.
- File upload – Question in which files can be uploaded.
- URL – Question in which a URL can be provided as answer.
- Repeater - Question in which a specific section of questions can be answered several times.
- Country selector – Question in which a country can be chosen from a selection of all countries.
- Currency selector – Question in which a currency can be chosen from a selection of currencies.
- Phone number - Question in which a phone number can be provided as answer.
- Person entity – Question in which the name, and potential other information, of a person is asked. The information provided can later be used to initiate a person screening in Pascal Screening.
- Default only one person's name can be provided as an answer. By selecting ‘Allow users to add multiple persons’, more than one person name can be provided in this question.
- The option ‘Require identification of person using Veriff’ can be enabled to verify the person’s identity during the onboarding process as well.
- Business entity - Question in which the name, and potential other information, of a business is asked. The information provided can later be used to initiate a business screening in Pascal Screening.
When adding questions to the Onboarding form template, there are some options available to enable in each question:
- Allow multiple answers – Some questions have the option to allow multiple answers. Default this option is turned off.
- Asses risk - Some questions have the option to allow risks to be attached to question answers. Default this option is turned off.
- Optional – When ‘Optional’ is turned off, the question is mandatory to be filled in for the form to be completed. Default this option is turned off.
- Internal – When ‘Internal’ is turned on, the question will only be visible to users of the Onboarding platform. When an external user is filling in the form, this question will not be shown. Default this option is turned off.
- Up and down arrow – The arrows in the top right corner of the question, can be used to move questions up or down in the Onboarding form template.
- Subtitle – All questions have the option to add a subtitle to the question. By selecting “Add subtitle”, a subtitle can be added.
Internal questions will be invisible to externals, these will only be visible to internal users who are reviewing the form filled in by the external user.
Questions in the form template can also be separated into different sections. To add a new section, press the Add section on the left side of the page under Sections. Here, you can also switch to different sections to refine questions in other sections.
Sections can be renamed by selecting the Rename button on the top of the page next to the current section name. Here, you also have the option to add additional information about the section by enabling Include description.
Finally, when all relevant sections and questions have been added to the form. The form name can be changed by selecting the Rename button in the left top section of the page. Afterwards, the form can be saved by pressing the Publish button in the top right corner.
Organisation functions
Functions can be created and assigned to users in Pascal. To add functions, the following steps can be followed:
- In Pascal's settings, select Users & groups under the Organisation section.
- Navigate to the Organisation functions card found below.
- In the Organisation functions card, press the Add function button.
- Type the name of the function to be added and press the Create button.
Organisation functions’ names can be changed by pressing the pencil button or alternatively deleted by pressing the red bin icon.
Approval templates
Approval templates are used to define processes in which approvals are required. When creating an onboarding process, an approval process can be selected from the templates available. These will be used later, when the onboarding is finalised and must be approved before completion.
To create an approval template, the following steps can be followed:
- In the Policies tab of the Onboarding section in Pascal's settings, view the Approval templates card.
- Press the Add approval template button.
- Insert the name of the approval template in the Name section. And select the Risk levels this approval template should apply to.
- Optionally, select Make default
- Press the Add step button and select one or more of the previously created functions. Users with a function selected in this step, will be asked first to approve within this approval workflow.
- Add as many steps with functions as desired in the approval template.
- Finally, press on Save to save the approval template.
/Getting%20started%20with%20Pascal%20Onboarding/Getting_started_with_Pascal_Onboarding_1.png?width=670&height=247&name=Getting_started_with_Pascal_Onboarding_1.png)
External theme
Optionally a theme can be set up to customise the onboarding form shown to externals. This external theme can be used to add your corporate identity. All pages externals will visit, will use this customised theme.
To create a theme, the below steps can be followed:
- In Pascal's settings, press on External configuration under the Onboarding section.
- In the Theme card, click on the Edit button.
- Here several options are present to edit the theme shown on external pages. Below a preview is visible so all changes can be seen immediately in this example.
- After all desired changes are made, press the Save button to save the changes.
/Getting%20started%20with%20Pascal%20Onboarding/Getting_started_with_Pascal_Onboarding_2.png?width=670&height=265&name=Getting_started_with_Pascal_Onboarding_2.png)
How to create and complete your first onboarding
After the initial setup has been completed, the first client and review process can be initiated:
- Navigate to the Home page or the Clients page and press the New client button.
- Click on the Client name field to fill in the name of the new client.
- Optionally, in new clients a description of the client can be provided in the Description text area and an identified can be added in the Identifier field.
- In the Assignee field, provide the assignee responsible for the client.
- Press the Next button when you have inserted all information.
- In the new section, provide additional client information. First specify if the client is a Person or a Business. Then provide contact information.
- Press the Next button when you have inserted all information.
- In the new section, provide if you would like to immediately initiate a review in the Review type option. If a review type is chosen, the form for the review can be chosen in the Form field.
- Press the Next button when you have selected the review and form.
- In the new section, provide the external users who should be send the form. You can add multiple users, if more people should access the form.
- Then, press the Create client button.
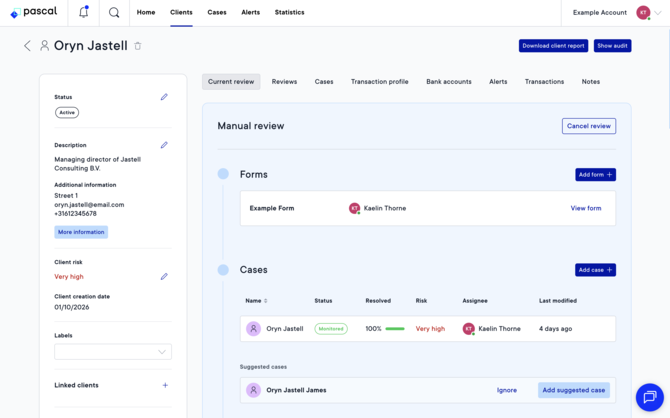
The client page shows all details about the review process you just initiated. In the top section the current active review is presented. The form can show the status Waiting for client, Submitted by client and Completed.
Cases within the current review shows you entities identified in the current active review, and cases already present in the client before the latest review started, are shown in the cases section. You can add cases via the Add case button, or open a case by clicking on the case itself.
The approval section of the current active review can only be started after the forms are all completed. The external user(s) must submit all forms, and the internal user must submit all forms after reviewing them. The approval can be started by selecting the Start internal approval and adheres to policies regarding the client risk and available approval flow of the client risk.
An email will be sent to them with a link to access the form. After using this link, a verification code will be sent to their email address to fill in before the form can be accessed. After all required questions are answered, the button Submit for approval should be used to finish the form.
After the form is finished and submitted, the client's assignee will receive an email to inform that the form was submitted by the externals. Now, the internal team can open the form to review the filled in information from the externals and optionally answer any internal questions in the form as well. After all internal questions are answered and the answers from the externals are reviewed, the form can be submitted for approval by pressing the Submit for approval button on the form page.
Entities provided in the form by the external can also be used to initiate an entity screening with. This can be done in the Cases section of the current review, by pressing the Add suggested case button. You can also add additional cases, which were not identified in the form, via the Add case button.
Now, the internal approval can start. The default approval template for the risk of the client will be used by default. Based on the policy configuration of the account, it can be possible to deviate from the default approval template with a professional judgement note.
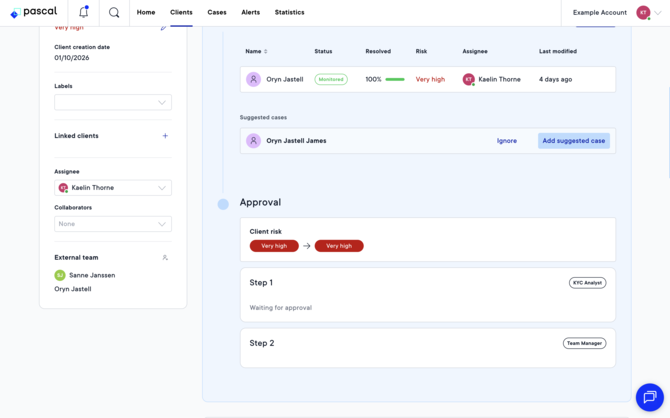
Now, the function(s) mentioned in Step 1 will have to approve the onboarding of the client first. Then, users with the function(s) mentioned in Step 2 will have to review and approve or decline the onboarding and so on until all steps have been completed.
After all approval steps are completed and the client is approved, the review of the client is completed. You can always check past reviews in the Reviews card and download the review there.
This documentation, including images, videos and text, is accurate as of Version 8.0 of Pascal.
We strive to keep our documentation up to date with each release to ensure it remains a reliable resource for our users. However, given the dynamic nature of our software development, there might be instances where changes introduced in subsequent versions are not immediately reflected in this documentation. We encourage users to refer to the latest release notes and to use the feedback mechanism for any discrepancies or requests for clarification.